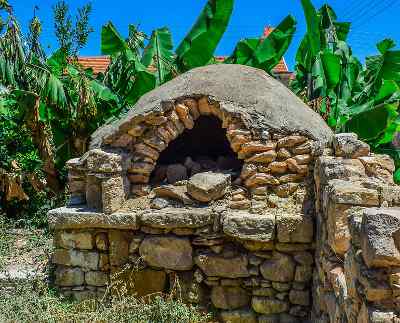
Easy How To Build An Earth Oven

An earth oven can be fired with regular wood but other biomass can be used as well. Most outdoor cooking today is done on grills or in pots above a flame. Some meals are more suited to an oven. An earth oven works as follows. A fire is set in the oven and this heats the thick wall of the oven. After the fire is removed from the oven the food is placed in the oven and the residual heat slowly cooks the food.
Earth ovens have many other names, mud oven being one of the most commonly used. I don't like that name because the variation I will cover here is not made from mud. Mud is sloppy and goopy. This one is made from sand and clay but that is nothing like the organic matter riddled stinky stuff that is sloppy and comes from the bottom of a ditch or swamp. So let's get to the brass tax on how to build one.
The first step is acquiring the materials you will use in its construction. A wood or rock floor of some sort is not required, however it will make the finished product better. Also, your oven will be turned to mud when exposed to enough rain, so it should be made under a roof of some sort. A smallish pavilion works great.
Next you will need a large pile of sand and another smaller pile of clay. It is much easier to get the mixture right if the clay starts off dry and powdery, but that isn't absolutely necessary. The clay will be used in two steps, if you have some dried clay then the first use of clay is the only application that dried powdered clay is needed for. crushed bricks work great for the powdered clay if you have them.
The first step in the actual building of the oven is to make a base for the oven. The base will need to be about 5 feet square. The size depends on the size of the oven you want to build. This base can be bricks, clay, sand, pottery or rocks. Whatever you have plenty of will work.
On this base you will put your sand. This first layer will be removed later. It is there for support and serves as a frame to build your oven walls on. Your oven should be large enough to hold pots and any cooking containers you plan to use in the oven. Most earth ovens have openings of about one foot wide and high at the entrance.
 The sand must be wet to hold its shape like when building a sand castle. The shape you need to make is exactly like an igloo. A half sphere with a short entrance tunnel. So, build an igloo with sand except yours will not be hollow like a regular igloo. Yours will be solid sand. No cavities. The igloo of sand will end up being the cavity of the oven after you remove the sand.
Now cover the sand with the wet paper or wet leaves. Thickness is not a concern. It can be as thin a layer as you can make it. The paper or leaves just separate the sand from the next layer so they don't stick together at all.
Next take one part sand and two parts clay and work it together until it is mixed completely. If it is not well mixed your oven will be a failure. It must be a homogenous mix of sand and clay. clumps of sand will crumble later and leave holes, cracks in your oven.
The mixing is not a trivial matter so plan on this step of mixing the two ingredients to take some time and energy.
After you have the mixture made, making sure that the sand is also still moist, start adding the sand/clay mixture to the igloo you made of sand. Make a wall that encompasses the sand igloo completely, with the exception of the front of the igloo. That will be the opening to the oven later.
Once you have enclosed the igloo from bottom to top in a three inch thick wall of sand/clay mixture you are done with that step. Now, add another layer on top of the sand/clay mixture. This layer will consist of clay and hay or straw mixed together. It will also need to be three inches thick if not a bit thicker.
Now you have to let it dry. This can take an entire month in humid areas. In dry low humidity areas it might be dried in only a week or two.
Once the earth oven has dried it is time to remove the sand from the center. Remember you left the front of the igloo entrance free of clay/sand and clay/straw walls. Simply scoop out the sand carefully.
You are likely to find that the inside of the oven is not completely dry. It will dry much faster now that the sand has been removed. So allow it to finish drying. You will see some cracking of the walls. Do not be alarmed. This is always going to happen. Just fill in the cracks with moist clay.
Once the inside of the oven has also dried you can light your first fire.
It is important that the entrance to the oven be about 60-65 percent of the height of the oven chamber. This is for air circulation when burning the fire.
Build a small fire at first to completely dry the oven.
Now you are ready to cook!
As you can see from the picture there are other variations. Stone, brick, firebrick and even metal can be incorporated into the making of your oven.
