How To Make A Primitive Kiln - Survival Manual

Temperature is everything when trying to make glass. So how are you supposed to know the temperature of your kiln without a thermometer to tell you? You can tell by the color inside the kiln.
When the kiln is a dull red color the kiln has reached 1100F. As it reaches 1300F it will be cherry red. At 1472 it will be a bright cherry red, sort of a burnt orange. As it turns to an orange color the temperature is 1650F. At 1830F the color is yellow-orange. At 2000F the color will be yellow. At 2192F the color will be a light yellow color. At 2370 the temperature will be almost white and the glowing is intense making it difficult to see inside. Pure white is achieved at a temperature of 2550F.
Traditional kilns have been large structures usually with dimensions of 12 feet long, but sometimes as much as 50 feet long. The size of your kiln can be adjusted to suit your needs. To make glass your kiln will be fired for long periods of time, often days. A large kiln will require more wood than a smaller kiln, but a very small kiln will need more steady attention.
Regardless of the size a kiln will need to be more elaborate than a simple fireplace if you are going to reach temperatures high enough to melt sand. Below I will discuss each part of the kiln and the actual design I will leave up to you.
The slab! Although not absolutely necessary I suggest a floor of concrete covered with a layer of cement block covered with fire brick. The walls and roof of the kiln will need to be thick so that they will hold in the heat. Thin walls will not have enough insulation to hold in the heat and give you the high temps that you need. Walls should be at least 12 inches thick. Thicker the better!
The firebox is where wood is loaded. The firebox should be located near the bottom of the kiln. This is the chamber where the actual burning of the charcoal or wood takes place. Depending on how you design your kiln the outlet for the fire box sometimes has holes in the floor that lead to the annealing chamber. The firebox should have an opening for intake air and a close-able door or hatch through which you can load fuel.
The chimney for exit gases needs to be similar, but can be scaled back as you move further away from the actual body of the kiln. A taller chimney helps to facilitate the pulling of air into the kiln, which is important.
Now to speak of the actual design and placement of these components, the most important design detail that you should absolutely incorporate into your kiln is to have a design that has a preheater. A preheater is an inlet to your firebox that uses the hot exhaust gases from the chimney to preheat the incoming air. One design would be to have the intake run adjacent to the chimney and the annealing chamber before entering the firebox. An even better design if you can manage it would be to have the intake air route run through the annealing chamber.
Forcing air into the fire pit via a fan, pump or billows will cause the fire to burn faster and therefore hotter.
A damper on the exhaust allows you to have great control on the speed of the fire.
If you intake air entering the firebox is 600 degrees instead of 70 then that air doesn't need to be heated as much by the fire to get to the super high temps melting sand requires.
A few notes on glass making. It takes a higher temperature to make the glass than it does to work with the glass. So, often in the past making glassware was a two-step process. First step is making ingots of glass from sand.
Then taking those ingots and softening them at a later date so they can be worked with to form an actual glassware product. And if you are lucky enough to have broken glass to work with it might be a way of avoiding the first step and the super high temperature required there.
Be aware that if you are using broken glass that the temps needed will not always be the same depending on the source of the glass and its properties.
If you are using a mold be positioned in a way that your bottle fills the mold as it melts or it can be poured into a mold after. Pouring after requires the use of large metal tongs to hold the crucible with. This is something you may not have handy. Obviously heavy gloves and even a face shield would be safety equipment desired to work with super-hot materials.
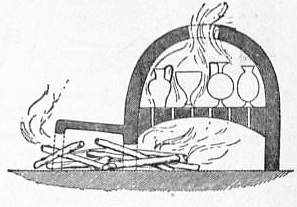
Pictured below is a simple kiln that was used in ancient times. Use this picture to begin formulating your own kiln design.

