How To Weave Your Own Cloth

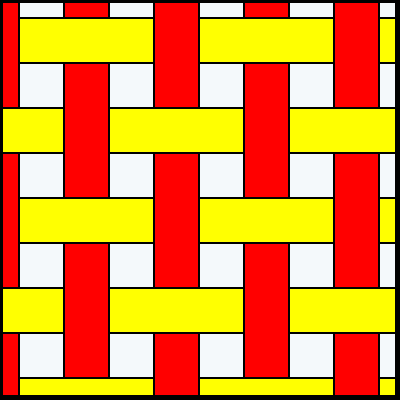
Weaving is the way in which thread or yard is put together to make cloth. Weaving involves nothing more than passing thread under and then over one another, not a bunch of fancy stitching, just over then under. Each successive row or column will go under where the previous thread went over. So no two threads will follow the same path as the thread that is next to it.
Weaving can be done by hand as well as with a loom. The loom makes the process a heck of a lot faster as well as easier. Another trick that makes weaving easier is to use two threads of different color so you can easily distinguish each and not get confused.
The weaving process consists of a series of very simple steps. The first step is called shedding. Shedding is the process where the "warp" threads are put on the loom. The warp threads are tied off to the corner or a part of the loom and then run to the other side then back again. Do this over and over and over again until the loom is full from one side to the other and finally tied off to keep the thread taunt. That is the Warp.
The second thread used is called "Weft". This thread is secured as well and then is threaded over and under the warp. The warp runs away from you and back. The Weft runs from left to right then right to left over and over again. As you can imagine threading the thread over and under thousands of times can be a very unpleasant endeavor. And this is where the beauty of the loom comes in. The loom has a means to lift every other thread so that the weft can be threaded quickly from one side to the other in one straight shot. As you pass the thread spool back through in the opposite direction the raised threads or lowered and the unraised threads are raised. Doing this assures you that the threads alternate over and under patterns. Sounds confusing when written, but look at the pictures and it becomes clear. This entire process of passing the Weft through the Warp is called Picking!

The final step is known as taking up. Taking up means that the cloth you have made is wound up onto a roller or beam.
Simple primitive looms may not ever have a "taking up" step. The finished product will simply be taken off of the loom by cutting the loops and tying them off.
Before you try to make an elaborate loom, I think it is best if you start with a very simple loom and here is how.
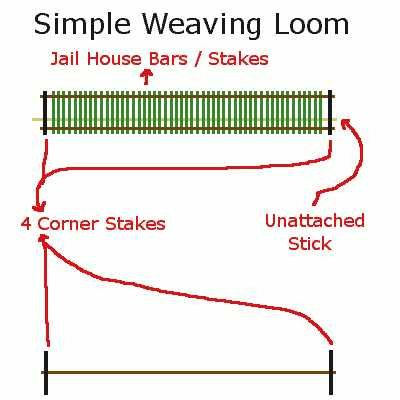
Decide what size cloth you want to make. Let's suppose it is to be 3' by 3'. Drive four stakes into the ground 4' by 4'. The loom must be bigger than the desired cloth. The stakes should be firmly in the ground and should stick up a foot above the ground.
Now, lash a stick on the north side of the staked square to the stakes about 2 inches off of the ground and another one about 10 inches off of the ground. On the South side lash a single stick about 7 inches off of the ground.
Now on the north side of the square drive in stakes so that they form what should look like a jail cell window. These sticks should be very close together and should ideally be lashed to the loom so that they will not move.
Now you need another stick the width of the loom and place it on the ground next to your North side. Tie a piece of cordage on the Southeast side of the loom and run it through the looms Northeast side and tie it to the stick on the ground. Do this again but instead on the western side.
OK, the loom is made. The Warp can be installed onto the loom. To do this, tie the thread to the stick on the South side. And run it North around the outside of the western most jail cell stake and tie it off midways up that jail cell bar. Do this for each bar.
The "jail cell bars" will need to be numerous or else you will only succeed in making a thin strip of cloth. The thicker your thread material is the wider the spacing can be and the fewer "bars" you will need. For this reason, yarn sized material is quicker and easier to make garments with.
You will now need to run a more thread back through the loom in the exact same manner as the first, except this time you do not tie off to the bars. Instead, run the thread between the bars to tie to the stick on the ground. So for every gap in the bars you will need to run a thread through each gap and tie it off to the north stick.
If the North side stick is on the ground every odd numbered thread will be higher because the threads tied to the stick are lower. If the North side stick is raised up, then the even numbered threads will be higher because the even numbered threads tied to the stick have been raised higher than the jail cell threads.
This raising and lowering of the North side stick allows you to simply lower the stick and pass the thread crossways between the threads then raise the stick and pass the thread through in the other direction creating the over under pattern without having to manually guide the thread over and under.
Run the Weft thread through the Waft with the stick lowered and then batten thread towards you. Next run the Weft back through in the opposite direction with the stick raised. Repeat until you have an appropriate sized material. Cut away from the loom and tie off the loose ends and your cloth is finished!

